Ok, maybe the title is a little dramatic, there is a chance you know about some of these tricks… but I bet you don’t know all of them! If you do, I’ll give you your money back. So, these are just some cool tricks that I’ve picked up from the salesforce community and I thought it would be cool to pass them along. Enjoy.
1. Auto-number Switcharoo
Myth: Auto-number fields only ever contain the numbers which the field has generated on its own. The truth is, you can jam anything you want in there! The loophole you use to do so is that you can change the “field type” of a field from Auto-number to Text or from Text to Auto-number.
So for instance, you can change an Auto-number to Text temporarily so you can modify some of the numbers that had been assigned previously, and then change it back to Auto-number so it will continue assigning numbers to new records. I have done this during migrations before so I can allow the migrated data to retain their assigned numbers in the previous org. Give it a whirl, it’s fun! Be careful though, while you have the type set to anything other than “Auto-number” records will be created without getting a number assigned.
2. Change a User’s Email Address Without Sending a Confirmation Request
Usually, when you change the email address on a user record an email is sent to the new value asking the user to confirm the change. Only when the confirmation link in the email is clicked will the change be reflected in salesforce. This happens regardless of how you update the email address… manually, API, etc. There is no way around it… or so I thought!
Turns out, if you change the email address AND check the “Generate new password and notify user immediately” checkbox (all the way at the bottom of the edit screen) then the email address gets committed right away, no confirmation needed! Obviously the catch is that the user then gets sent a new password… so it’s not any better in some situations.
I use this trick a lot in sandboxes. You know how it is, you tell a user what their username is in the sandbox and tell them to use whatever password they were using in production when the sandbox was last refreshed… and they don’t remember and ask you to reset it… so you’d have to explain that they need to confirm a change to their email first… you get the picture. Now you just update the email and get them a new password in one shot.
3. Mass Email Activity Ghostbusting
The scenario is that you send mass email to leads or contacts, and you select the option to “store an activity for each mail”. Then after the mailing completes, you check out the activity history on one of the recipients and see the subject of the task shows as “Mass Email:” as illustrated below. The colon in there lets you know that something is meant to be there, but didn’t quite make it there. Spooky…

4. Id Growth Formula
This one is an oldie but goodie. Although you probably know the deal, I’ll give the background info in case you don’t. Salesforce gives all records an 18 character Id, but sometimes they show up only as 15 characters. This is because if you are working in a case-sensitive system, the first 15 characters is enough for it to be a unique Id… but if you have the last three characters also, then even if you ignore the case the Id is still unique.
Ok, so obviously to go from 18 characters to 15 you just drop the last 3 characters. The cool part is, that if you have the 15 character Id you can generate the last three characters to compose the 18 character Id. Here is an apex snippet that does the conversion. Also, check out this blog post from @ekenigsberg and @AstadiaAShan that gives a formula to do the conversion and explains the mechanics of how the conversion is done… sweet.
5. The Secret Tab Trick
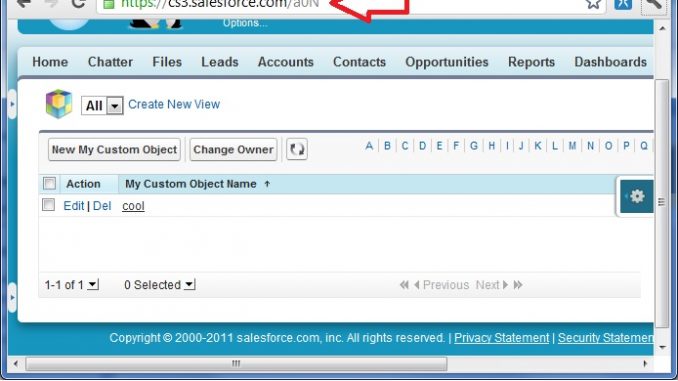
This is a neat trick that came to me from @arrowpointe. As you know, when you create custom objects you can easily create a custom tab which allows you to create views from which you can view and manage the records in the object. Well, it turns out you can do this even if you haven’t created a tab. All you have to do is go to your URL bar, and after the “.com/” enter the 3 character prefix of the object. The prefix is easy to find, it is the first three characters in the Id of any record in the object. You do this, and you’ll be on a “secret” tab that otherwise you can’t navigate to. Here is an example, note the cool little cube logo that shows up :-).


Leave a Reply